This is hands-down the easiest way to dye Easter Eggs. No dipping or fishing the eggs out of cups of dye. Instead, in this method, you take the dye to the egg!
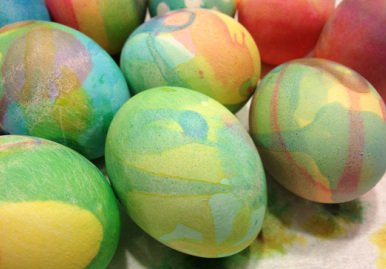
The end result is a fun little work of art.
Even better: you can do several eggs at once, the kids will love it, and you'll love the easy clean up! All in 30 minutes or less!
The end result is a fun little work of art.
Even better: you can do several eggs at once, the kids will love it, and you'll love the easy clean up! All in 30 minutes or less!
A berry colander on top of a large dinner plate worked great!
You'll Need:
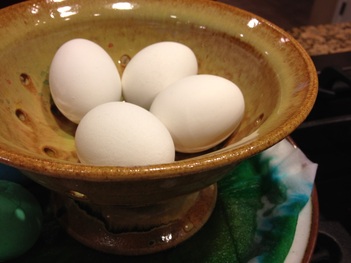
* Hardboiled Eggs
* Hot Water
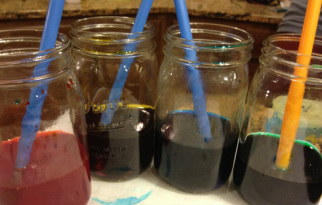
* Food Coloring
* White Vinegar
* Jars or cups to keep the dyes in
* Either medicine syringes or straws
* Large Plate
* Colandar
* Hardboiled Eggs
* Hot Water
* Food Coloring
* White Vinegar
* Jars or cups to keep the dyes in
* Either medicine syringes or straws
* Large Plate
* Colandar
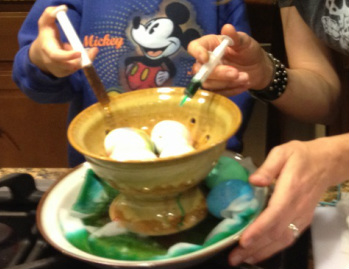
The colander helps catch and divert any overspray and splatter!
Directions:
* Add 1 Tablespoon of Vinegar to 1 cup of hot water - use a separate cup/jar for each color you plan to use.
* Add in 20 drops of food color in the separate cups/jars and stir well
* Place a few eggs in your colander
* Place the colander on the plate (we also added a paper towel to help absorb the drips)
* Use a straw or medicine syringe to transfer colors to the eggs:
 You can use straws - simply place your fingertip over the end to hold the dye in the straw until you're ready to release it over the egg. | 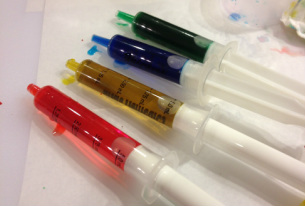 Or, you can use medicine syringes. You can get these (usually for free) at your pharmacy if you ask at the prescription desk. We liked these a lot! |
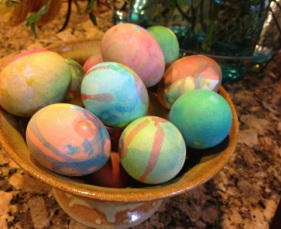
As you transfer the color over the eggs, simply let it drip and fall where it wants. I'm sure you can get more creative if you like, but for us, we just liked the cool watercolor-effect of the colors overlapping each other in an organic way. When the upside of the eggs looked nice and covered, I rolled them over in the colander and dripped dye on the other sides as well. The end result was really nice, and they made a lovely addition to the Easter table!
 RSS Feed
